
The following instructions are a guide directed at the Tradesman or experienced Handy Person. We are happy to provide further assistance over the phone if needed.
Click Here for an Adobe 'FLASH' Installation demonstration and Here to see the Finished Product.
Preparation for Installation
If your surface is not flat, as is the case with the walls and ceilings of a lot of older homes, then Battens, Plywood, Plasterboard or Render can be used to level the surface. In a ceiling installation for example 2" x 1" battens (finished 40 mm by 19mm) should be the minimum size. Where cover strips are used in conjunction with the body panels, battens should be at least 75mm wide to allow nailing on both sides of the border. The simplest way to install our panels is to use building ply as sub-strata fixed directly to ceiling or awning joists or over an existing ceiling. This surface is easily leveled and does not require planning for batten layout. This installation method is our recommendation for the less experienced Handy Person; a Trades Person where time is of the essence; a complicated layout; and for all awning installations.
Laying Out
A ceiling should be set out using string lines intersecting at right angles at a convenient place toward the centre of the room and oriented roughly parallel to the walls. These lines should then be translated parallel to form secondary sets allowing for sheet size and number to either economize on the number of sheets to be used; to centre a feature pattern; or to accommodate other features like chimneys in a particular installation. Battens (if used), should then be nailed across the joists at approx., 300 ml centres to suit the sheet size and the joint locations. Cross battens should be provided where panels will join, overlap or end, and these may need to be further stiffened from behind if they are too springy and therefore difficult to nail into.
Fixing
There are many ways of installing this product: gluing - nailing - pop-riveting - and various combinations of these. Each application is dependent upon the surface that the panels are to be fixed too.
Nailing:
Plated HardBoard or Soft Sheet nails should be used. Placement of these nails is important to ensure the least amount of damage to the pattern relief during installation.
Glueing:
The use of a Stud Adhesive is an extremely simple and efficient way of installation and is the recommend method for all wall and ceiling installations. The adhesive is dabbed on the back of the panel, as in the photos below. The sheet is then pressed into place lightly and then aligned. A stud gun, or peel pop rivets, can be used to hold the panels in place if the panels are applied to plywood (recommended). For a hallway, bench top or bathroom installation horizontal temporary battens or skirting is the ideal support for the bottom row. A few tacks may be required to hold other sheets in place, as they can skew side ways when unsupported. It is difficult to achieve good results with glue when working alone with ceiling fixing.
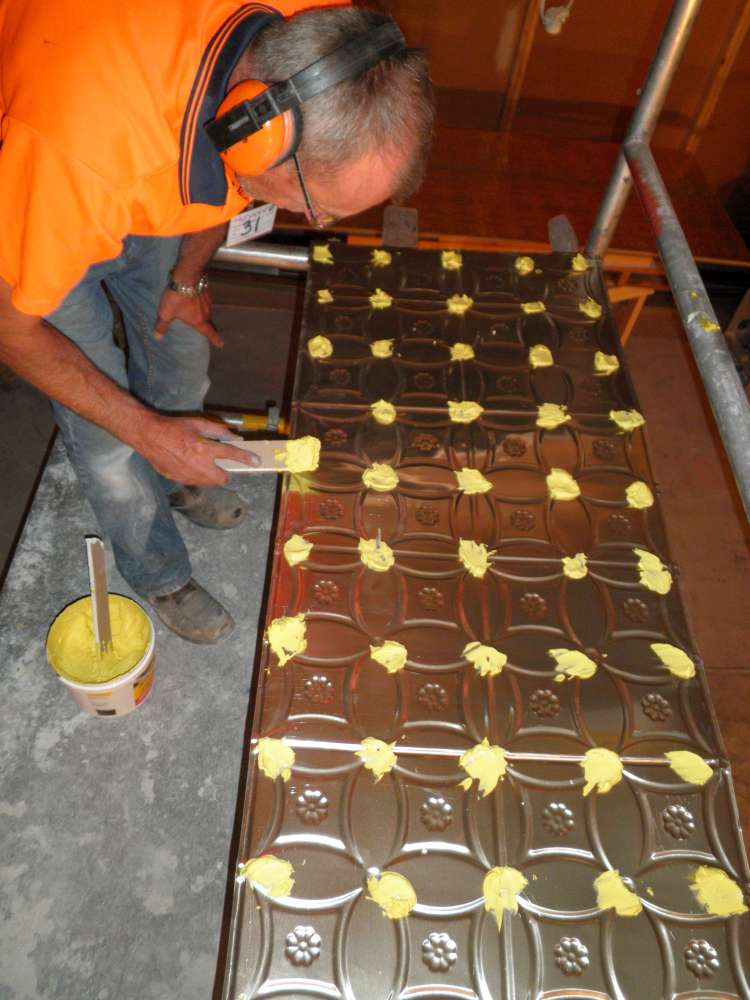
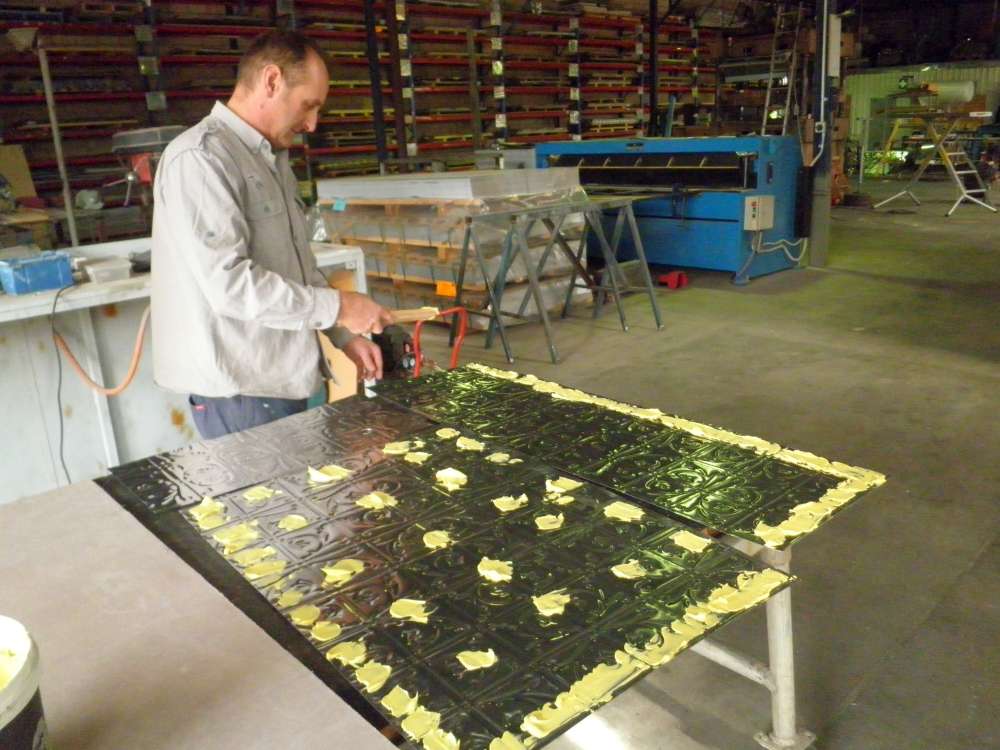
Photos showing application of Stud Adhesive - note additional glue along the edges in the second photo, where the panels were being fixed to a backing board for installation behind a slow combustion heater in a fireplace.
Pop-Riveting:
Is often used in the modern home where metal ceiling battens have been used. A combination of rivets and glue is the recommended fixing technique. Split rivets can also be used to close any unsupported joins and are very effective when installing over existing pressed metal, fibro, masonite or plaster board.
 |
 |
Joining
This is perhaps the most important step and the easiest to trip up on. It is crucial to make sure allowance is made for overlapping adjoining sheets. All sheets are designed to provide an overlap at the edges and the 'fit' can be felt when lining sheets up. It is best to practice for this feel by trials on the floor with whole sheets. The direction of the overlap must also be considered at the layout stage and we recommend that panels be laid outwards from the centre of the grid making sure they overlap away from the primary entrance to the room. It is also important to fix from the centre of the sheet outwards to avoid buckle or sag. When fixing ensure the lap and the fit, but leave the nailing or riveting of the lap until last.
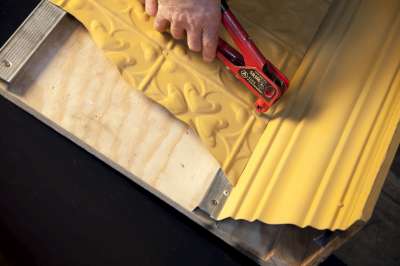
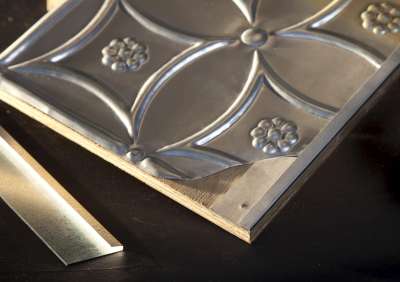
Cutting of Wunderlite Panels
Cutting can be done by:
- scoring and bending over a straight edge
- with heavy-duty scissors or tin snips
- with electric shears
The layout should allow cuts only on the outer perimeter where possible. Finished edges, Cover Strips or Cornices should cover all cuts.
Filling and Painting
|
Wunderlite aluminium panels are supplied in either raw or etch primed aluminium. The conversion coating costs $5.00 per panel, and aviods the difficulties of etch priming raw panels after installation. Fill all joints with a flexible filler and finish with two coats of either acrylic or oil based paints. |
 |
Installing Cornices
Cornices are the first item to be installed after laying out the ceiling and installing the batten grid or ply. To help identify the orientation of the cornice, the top edge (flange) should lie flush to a ceiling batten forming the perimeter of the grid. The outermost ceiling sheet cut to suit ultimately covers this top flange. The bottom edges of the Cornice butts against the wall and is nailed from below into a batten fitted to the wall for this purpose.
Installing Cover Strips and Corner Caps
|
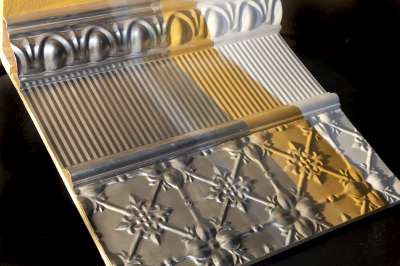
Cover Strips and Caps are used to cover joints between different pattern styles and are most commonly used to frame the junction between filler strips and feature panels. They can also be used effectively on a plain ceiling to provide a relief decoration or along a wall as a chair rail decoration. (In this last application the strip should be filled with plaster or another filler to provide strength). Cover Strips should be joined by cutting and overlapping along any repeating patterns they may have. Strips can be either butted up against the Corner Caps or the edges of the Caps cut to cover mitred or other joints. Any gaps can be filled with flexible filler. The J Strip (image to the right) is used to finish sheets cut mid pattern. The strip is attached first with the sheet fitting into the J strip. |
 |